Gorlu the printer

Initial idea
One evening in October, seeing the Arduino box sitting on the shelf, I started thinking about creating something more complex than the usual "on/off led" or simple sensor...
A few days before, I was watching a YouTube video of this small automated printer, and so I took inspiration from it.
Searching online I saw that it was a very common project and practically all the necessary code was already there, ready to be downloaded from the GitHub repository. But no, I don't like easy things and I'm never satisfied with them.
The objectives
Having decided to create something more than a simple CNC plotter, I thought about the functions I wanted to integrate:
- Printing of digital images (any format) obviously simplifying them first and then analyzing them in search of what could be defined as the main lines of the image;
- The possibility of printing in real time any line drawn freehand on the PC. Use the plotter as a real robotic arm synchronized with your hand;
- And finally, even if added while "work is in progress", the function of printing a real text with the possibility of choosing font, size, alignment, etc...
Having defined the main objectives, I started by writing the code.
Setting up the code
Since up to that moment I only knew C and a few web languages, I decided to learn Python's syntax so that I could take advantage of the multitude of libraries that I knew were available online.
The code is based on Python for the analysis, elaboration, and the graphical interface, and on C++ for the Arduino program.

Among the most important libraries I have chosen to use are:
- OpenCV + PIL for processing and extracting data from images;
- NumPy for manipulating arrays and matrices (useful since image files are stored in RAM as matrix);
- pySerial for communication via USB port with Arduino;
- Tkinter for creating the graphical user interface (GUI);
- AF_Motor.h for controlling the electrical signals to the printer motors.
The algorithm
The main algorithm, the one that has to do with digital image printing, is basically a search and sort algorithm.
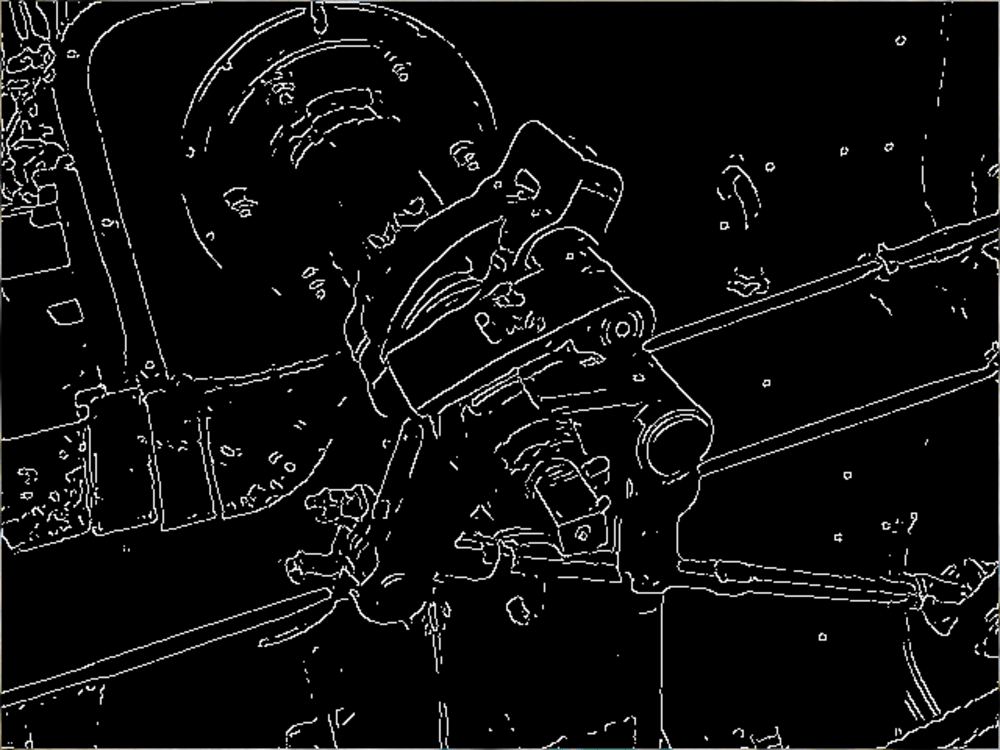
Given an input image, it simplifies it (using the Canny() function present in OpenCV) by extracting the main lines and then saving the identified pixels in a two-dimensional matrix.
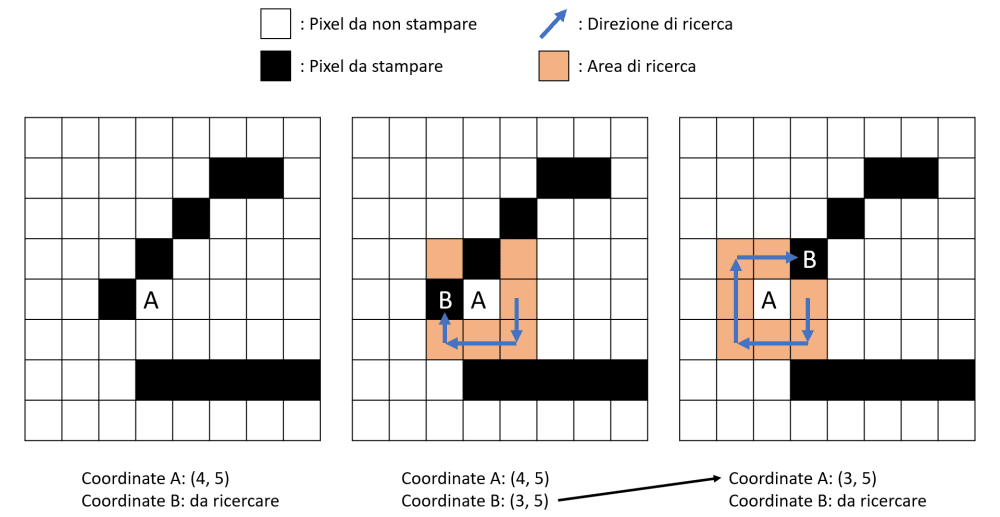
It is then scanned with the logic of printing not single dots (which could lead to problems with pen ink) but continuous lines. Given an element A, the algorithm scans its pixels in neighboring positions looking for an element B to print. If successful, it sends the coordinates to the Arduino, otherwise it widens the search field, always centered on A, until a B element is identified. The program then loops, taking as its starting point the coordinates of the B element it has just identified, and continues in the same way until the whole matrix has been scanned.
while not img_to_print.all():
        i, cont = 0, cont + 1
        while True:
            i += 1
            try:
                y = np.where(img_to_print[max(0, Y-i): Y+i+1, max(0, X-i): X+i+1] == 0)[0][0]
                x = np.where(img_to_print[max(0, Y-i): Y+i+1, max(0, X-i): X+i+1] == 0)[1][0]
                X, Y = x + max(0, X-i), y + max(0, Y-i)
                img_to_print[Y][X] = 255
                break
            except:
                pass
Since its simplicity and low computational complexity, the algorithm is fast and resource efficient. In addition, working always and only within the RAM, there is never the need to save data on the hard disk and this allows to leave the PC free from unnecessary temporary files.
Both digital image and text printing functions are managed by the algorithm described above. In fact, when you choose to print text, the program transforms the written sheet into an image (by taking a sort of screen capture) and passes it as an input argument to the algorithm, which will process it like any other image.
Speaking about the simultaneous printing hand/Arduino function, this is handled simply by sending the coordinates of the mouse when the touch is active. Nothing simpler.
The structure
Obviously nothing would work without a good structure ahead. The printer can be simplified to be composed of 2 main parts:
- Two carriages with their motors;
- The pen height control system.
In particular, the two carriages are used to move the sheet along the two directions X and Y (to be precise, along one direction the sheet itself is moved, while in the other direction the pen is moved). They are made from two DVD drives from an old computer, and the motors that move them (already integrated in the original structure) work by rotating n° micro-steps per time.
This type of motor is in fact called a stepper-motor and they do not work using the login of angles of rotation, but counting the number of rotational steps to be completed (usually a complete revolution is divided into ~500 steps). Knowing the rotation associated with each step and therefore the consequent displacement of the carriage, it is easy to convert the delta between two pixel coordinates into a given number of steps to be taken to achieve the necessary pen displacement.
The mechanism for the movement of the pen along the Z axis is slightly more complex and delicate: it is composed of a servo-motor tied with an inextensible wire to the lead of the pen. When the pen is to be raised, the servo rotates a few degrees, stretching the wire and pulling the pen lead upwards. To return the lead to the paper, the servo releases tension along the wire, and a rubber band pushes the lead down.
In this way, since the rubber band always generates the same force on the lead, the print will always have an even distribution of ink (great, isn't it?).
Gorlu the printer!
After a few days in front of the PC programming and a couple of nights with hand tools, the GORLU printer was officially born :).
The name never had a precise meaning and came to mind during its assembling. But I liked it right away and after all, why not?
Here are some videos of the finished project... Enjoy!
Make it yourself
If you want to try to make it yourself, you can find some useful files at the bottom of the page in the attachments section. You can also find the code at this GitHub repository.
Once downloaded, you will need to install Python and the additional libraries, if not already present on your PC.
//Windows
cd C:/Users/ *User_Name* /AppData/Local/Programs/Python/Python39/Scripts\
pip install opencv-python pillow numpy pyserial tk
After installing the AF_Motor.h library and loading the Arduino sketch on the board, you are ready to start the main.py file and play with your new CNC plotter!
Forum
In order to partecipate to the discussion, you have to be Logged. Click on 'Personal Area' from the main menu on top of the page.
Write your post!
If you have to insert special element like images, ordered list or other, use normal HTML syntax.
